Updated April 2024: Stop getting error messages and slow down your system with our optimization tool. Get it now at this link
- Download and install the repair tool here.
- Let it scan your computer.
- The tool will then repair your computer.
The correct procedure is to uninstall Avast from the Programs and Features window. This will launch the Avast uninstaller, which will continue the uninstallation. However, uninstalling antivirus is not as easy as uninstalling another application. The antivirus files are protected by digital signatures that only a “trusted installer” (in this case Avast) can work with. During the uninstallation process, you will need to provide signatures to complete the uninstallation.

Avast will install a fake operating system to complete the removal. The user will then be forced to reboot the computer in safe mode. Since Avast was the last operating system installed, it becomes the default operating system. When the computer reboots, the Avast operating system will load and Windows will open in safe mode. Avast will then perform a complete removal, leaving behind the uninstaller, registry keys and some files. Even if your antivirus has stopped working, you will need to complete the removal by removing any remaining files.
Avast was mostly removed from the system, but some files remained. Users have complained that these files seem to keep the antivirus working. You may still see antivirus pop-ups asking for updates. This annoys users who thought they had already uninstalled Avast antivirus. How to remove all residual antivirus files once and for all? We are going to give you some of the known methods to complete antivirus removal and popup removal.
April 2024 Update:
You can now prevent PC problems by using this tool, such as protecting you against file loss and malware. Additionally it is a great way to optimize your computer for maximum performance. The program fixes common errors that might occur on Windows systems with ease - no need for hours of troubleshooting when you have the perfect solution at your fingertips:
- Step 1 : Download PC Repair & Optimizer Tool (Windows 10, 8, 7, XP, Vista – Microsoft Gold Certified).
- Step 2 : Click “Start Scan” to find Windows registry issues that could be causing PC problems.
- Step 3 : Click “Repair All” to fix all issues.

How to disable Avast self-defense mode

To disable self-defense mode in Avast, you need to access the “hidden” settings area.
- Open the Avast user interface and click Menu at the top of the user interface.
- In the drop-down menu that appears, select Settings.
- A new settings window will open. Select “General” on the left navigation bar, and then select “Troubleshooting” on the submenu.
- Uncheck the box next to “Enable self-protection” to disable self-protection mode.
- A pop-up window appears asking you to confirm. Select OK to confirm the change.
- At this point, self-protection mode is disabled and you can close the settings window and the Avast user interface.
Uninstall using the Avast Uninstall utility.

- Download the Avast Uninstall utility configuration file and save it in a familiar location on your PC (by default, downloaded files are saved in the Downloads folder).
- Right-click on the downloaded avastclear.exe installation file and select “Run as administrator” from the context menu.
- When you are prompted for permission in the User Account Control dialog box, click Yes.
- Click Yes when prompted in the “Erase Avast antivirus” dialog box to restart Windows in safe mode. Then click Yes again to immediately restart your computer in Safe Mode.
- When Windows restarts in safe mode, select the location of the Avast program files. The default installation location is automatically selected, so you do not need to make any other changes unless you have changed the default installation.
- From the drop-down menu, select Avast Free Antivirus. Then click on “Uninstall”.
- Wait until the Avast uninstaller removes all Avast Free Antivirus files from your computer.
- Click “Restart Computer” to immediately restart your computer and complete the removal.
Avast Free Antivirus will be removed from your computer.
Uninstall Avast using Windows Settings
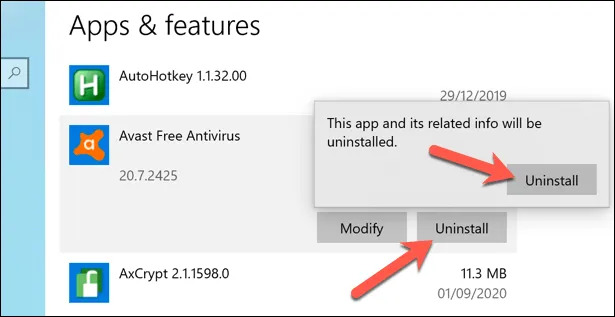
For most users, the easiest way to uninstall Avast is to use the Windows settings menu and uninstall it just like any other software. This should work for most users. If you’re having trouble completely uninstalling Avast, you may need to skip this section and try one of the alternative methods below.
- To do this, right-click the Windows Start menu and select “Preferences” from the preferences menu.
- In the Windows preferences window, click “Applications”> “Applications and Features”. A list of installed software will appear. You can use the search bar or manually scroll and select Avast Antivirus.
- After selecting the entry, click “Uninstall”> “Uninstall” to uninstall Avast.
- This will launch the Avast uninstaller. Click Uninstall to start uninstalling the software.
- As a security feature, Avast will ask you to confirm that you want to disable the virus protection and start uninstalling it. Click Yes to confirm.
- The Avast uninstaller will start removing all Avast files from your computer. You will then need to restart your computer. Click “Restart Computer” to do this now, or “Restart Later” to restart your computer manually.
- After restarting, your antivirus protection will be reset to Windows security. If another antivirus program is installed, this protection will take over its protection.
Expert Tip: This repair tool scans the repositories and replaces corrupt or missing files if none of these methods have worked. It works well in most cases where the problem is due to system corruption. This tool will also optimize your system to maximize performance. It can be downloaded by Clicking Here

CCNA, Web Developer, PC Troubleshooter
I am a computer enthusiast and a practicing IT Professional. I have years of experience behind me in computer programming, hardware troubleshooting and repair. I specialise in Web Development and Database Design. I also have a CCNA certification for Network Design and Troubleshooting.