Updated April 2024: Stop getting error messages and slow down your system with our optimization tool. Get it now at this link
- Download and install the repair tool here.
- Let it scan your computer.
- The tool will then repair your computer.
In the NVIDIA Control You panel, on the View menu on the left, you should see “Configure G-SYNC”. If you don’t see the Configure G-SYNC option and you’re sure it’s enabled on your monitor, you may need to manually install your monitor drivers.
Right click on desktop.
Select NVIDIA Control Panel.
Expand an item in the sidebar.
Click Set Up G-Sync.
Check the following box to enable G-Sync.
At the bottom, select to enable G-Sync for full screen only or full screen and windowed.
If you are a PC player, chances are you have heard of G-Sync. It is an exclusive adaptive synchronization technology developed by Nvidia, which is probably the best in the industry despite strong competition from AMD’s FreeSync. G-Sync is about preventing the screen from tearing in video games, but to use it, you need a computer monitor supported by G-Sync. Since G-Sync is hardware-based, players will have little reason to activate V-Sync software.
Over the years, Nvidia has been attacked because of the proprietary nature of G-Sync, as there are free alternatives. Anyway, this adaptive synchronization technology is still the best, but it poses some problems.
Nvidia G-Sync does not work
Does your computer run under Windows 10? If so, you may be one of many people who have experienced problems with G-Sync. We understand that some players cannot find the service in the Nvidia control panel.
For others, it is not visible, while for some, service is completely interrupted. So the question is what needs to be done to fix it. We can say with certainty that there are many ways to solve your G-Sync problems, so continue with us.
Install the latest G-Sync driver
April 2024 Update:
You can now prevent PC problems by using this tool, such as protecting you against file loss and malware. Additionally it is a great way to optimize your computer for maximum performance. The program fixes common errors that might occur on Windows systems with ease - no need for hours of troubleshooting when you have the perfect solution at your fingertips:
- Step 1 : Download PC Repair & Optimizer Tool (Windows 10, 8, 7, XP, Vista – Microsoft Gold Certified).
- Step 2 : Click “Start Scan” to find Windows registry issues that could be causing PC problems.
- Step 3 : Click “Repair All” to fix all issues.

It is always important to keep drivers up-to-date, as many problems can be solved by a simple update. Visit the Nvidia G-Sync website here, download the latest driver, install it, then select the Custom Installation option.
Then select Clean Installation and follow the options on the screen to continue and complete the installation.
What if I already have the last driver installed?
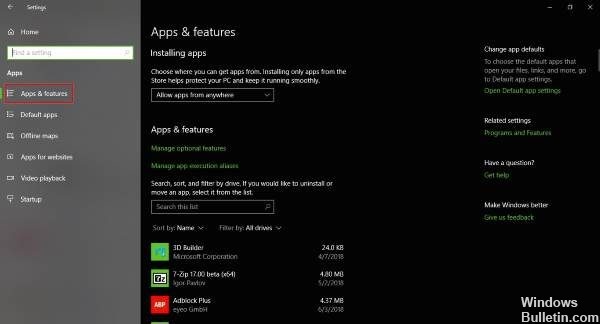
OK, so if you already have the last driver installed and G-Sync is active, the last driver may be defective. The best option is to return to the old driver by pressing Windows + I, then navigating to Apps & Features.
From there you can find and delete the desired driver/program, no problem.
Now, when you are finished, visit the Nvidia website and download the previous version of the driver and do your job by installing it. Then restart your Windows 10 computer and carefully check if G-Sync is working again.
Enable V-Sync
Some users say that one of the few ways to fix G-Sync when it doesn’t work is to enable V-Sync. That doesn’t make much sense, but we suspect it’s a Nvidia mistake.
To activate V-Sync, simply launch the Nvidia control panel and navigate to Manage 3D Settings. Next, go to Global Settings and click the Vertical sync option, then set this option to On and finally Apply.
Restart your Windows 10 computer and things should work as expected from there.
Is G-Sync configured correctly?
For Windows 10 drives, it is very important to check from time to time if G-Sync works as desired.
Simply turn on your computer screen supported by G-Sync and turn off your system. Make sure the monitor is turned off when the PC is turned off. Now check if your monitor is in G-Sync mode.
Restart your computer and navigate to the Nvidia control panel. Here you have to turn off G-Sync, turn it on again and finally restart your computer.
If nothing works, the last option is to contact Nvidia support for expert help.
Expert Tip: This repair tool scans the repositories and replaces corrupt or missing files if none of these methods have worked. It works well in most cases where the problem is due to system corruption. This tool will also optimize your system to maximize performance. It can be downloaded by Clicking Here