Updated April 2024: Stop getting error messages and slow down your system with our optimization tool. Get it now at this link
- Download and install the repair tool here.
- Let it scan your computer.
- The tool will then repair your computer.
In recent years, Microsoft has significantly simplified file sharing under Windows. All you have to do is click on one or two buttons to make your files visible to other users on the same network. It is interesting to note that file sharing is not limited to Windows computers because you can even view your files on an Android phone.

Sometimes file sharing will not work suddenly, or you will not be able to view your files correctly on other devices. This can be very frustrating.
But don’t worry, we’ll help you solve the problem. Here are some solutions to get file sharing back on track under Windows 10.
Check Settings for All Networks Workaround
On your computer, go to the C:\Users folder and right-click on Public.
– Open Properties.
– Select the Security tab and click on Edit.
– In the Authorizations dialog box, click Add.
– The new dialog box opens and you can add Everyone and click OK.
– When you return to the Authorizations dialog box, select the permissions you want to give to other users.
– The same principle applies to each folder you create and want to share on your home network.
April 2024 Update:
You can now prevent PC problems by using this tool, such as protecting you against file loss and malware. Additionally it is a great way to optimize your computer for maximum performance. The program fixes common errors that might occur on Windows systems with ease - no need for hours of troubleshooting when you have the perfect solution at your fingertips:
- Step 1 : Download PC Repair & Optimizer Tool (Windows 10, 8, 7, XP, Vista – Microsoft Gold Certified).
- Step 2 : Click “Start Scan” to find Windows registry issues that could be causing PC problems.
- Step 3 : Click “Repair All” to fix all issues.

Enable file sharing under Windows 10

- Open Network and Sharing Center by clicking Start > Control Panel, click Network and Sharing Center, and then click Advanced Sharing Settings.
- To enable network discovery, click on the arrow to expand the section, click Enable network discovery, then click Apply. If you are prompted to enter an administrator password or confirmation, enter the password or type the confirmation.
- To enable file sharing, click the arrow to expand the section, click Enable file and printer sharing, and then click Apply. If you are asked for an administrator password or confirmation, type or confirm the password.
- Click on Save Changes.
Check if the Computer Browser service is available.

Check if the Computer Browser service is working.
Step 1: Go to Start and type services.msc in Start Search.
Step 2: Locate the computer’s browser. Right-click on it and select Properties. Make sure it is started.
Step 3: When it is stopped, select Start or Restart. And make sure that the service is started and set to Automatic.
When you make a change, click Apply and OK.
Checking your Windows firewall settings
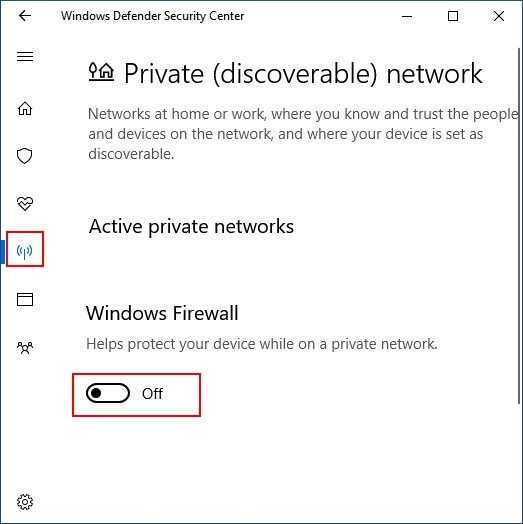
If you are still having problems, make sure that the Windows firewall does not block file and printer sharing. Proceed as follows:
- Open the Windows firewall by clicking Start > Control Panel, click Security, then click Windows Firewall.
- Click Allow a program via the Windows firewall. If you are prompted to enter an administrator password or confirmation, enter the password or type the confirmation.
- In the Program or Port list, make sure the File and Printer Sharing check box is selected, and then click OK.
Restart the network connection
Sometimes, restarting or disabling and reactivating a network connection or adapter can help make sharing work. The adapter may not work properly, whether it is a failure of the adapter itself or Windows.
To update the connection, open the Network Connections window from the Control Panel or Network Center and Sharing of Windows 10, right-click the problem adapter, then click Disable. Give it a moment, then right-click again and click Activate.
https://forums.adobe.com/thread/2486709
Expert Tip: This repair tool scans the repositories and replaces corrupt or missing files if none of these methods have worked. It works well in most cases where the problem is due to system corruption. This tool will also optimize your system to maximize performance. It can be downloaded by Clicking Here

CCNA, Web Developer, PC Troubleshooter
I am a computer enthusiast and a practicing IT Professional. I have years of experience behind me in computer programming, hardware troubleshooting and repair. I specialise in Web Development and Database Design. I also have a CCNA certification for Network Design and Troubleshooting.