Updated April 2024: Stop getting error messages and slow down your system with our optimization tool. Get it now at this link
- Download and install the repair tool here.
- Let it scan your computer.
- The tool will then repair your computer.
Go to Administrative Templates > System > Troubleshooting and Diagnostics > Hard Drive Diagnostics.
Check and uncheck the box, click OK.
Solution #1: Use a system check file.
Solution #2 – Run Chkdsk No. 3:
Solution Check hard disk bad sectors with DiskGenius Free Edition.
Solution #4: Contact your hard drive or contact support to find a professional repair center.
Use the file system checker to fix the hard drive error. Provides Windows with some basic error fixing tools such as System File Checker.
Run CHKDSK Fix for hard drive problem.
Use partition manager software to check and fix disk/disk errors.
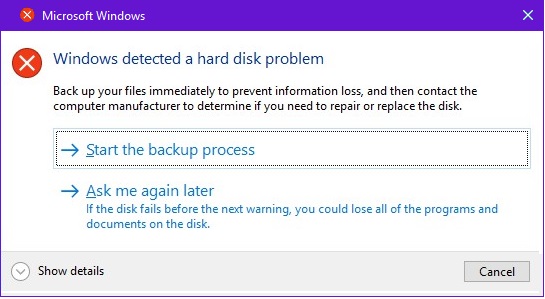
Computer disaster preparedness has taken a new turn with Windows 10. Gone are the days when you get caught by an awkward situation like a failing hard drive. Windows slowly but surely developed a system for recovery so that you can backup your hard drive before it completely goes dead. It flashes a message on-screen that says “Windows detected a hard disk problem” to help you backup your files before repairs.
First, Why Did You Receive a Hard Disk Problem Alert?
In some cases, you get this message because Windows found bad sectors on your hard drive or a faulty mechanism. At others, you receive this message because of a damaged system file or software error.
A bad hard drive should be replaced by a new one, but a bad software should be corrected quickly because it may lead to sudden loss of information or computer break down. The purpose of this article is to prepare you with a number of easy to follow troubleshooting techniques. At any rate, make sure you backup your file and read on to find out how to get rid of the “Windows detected a hard disk problem” message.
April 2024 Update:
You can now prevent PC problems by using this tool, such as protecting you against file loss and malware. Additionally it is a great way to optimize your computer for maximum performance. The program fixes common errors that might occur on Windows systems with ease - no need for hours of troubleshooting when you have the perfect solution at your fingertips:
- Step 1 : Download PC Repair & Optimizer Tool (Windows 10, 8, 7, XP, Vista – Microsoft Gold Certified).
- Step 2 : Click “Start Scan” to find Windows registry issues that could be causing PC problems.
- Step 3 : Click “Repair All” to fix all issues.

-
Run CHKDSK on your hard drive. There are several ways to do this.
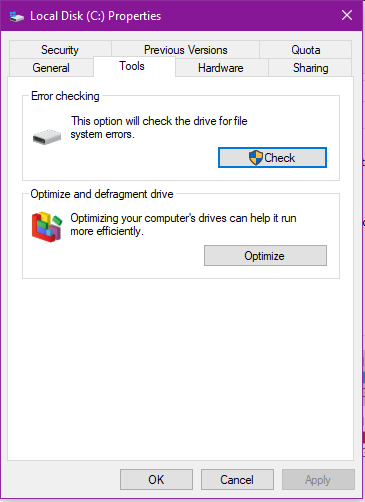
- Run CHKDSK from Drive Properties
- Open File Explorer Window on taskbar.
- Right click on the drive that you wish to check, click Properties.
- Go to “Tools” tab and click the “Check” button.
- Make sure the radio buttons for “Automatically fix system errors” and “Scan for and attempt recovery of bad sectors” are both checked
- The process may run immediately if the drive is not in use, or you may need to restart the computer to complete the process.
- Run CHKDSK from Drive Properties
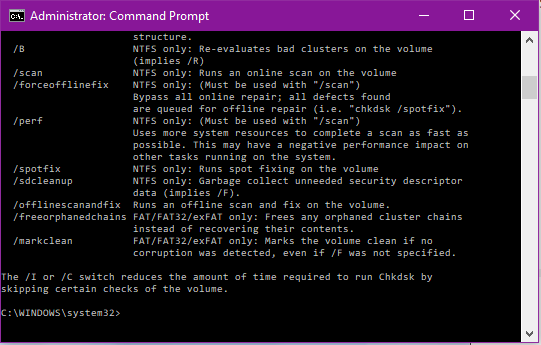
2. Run CHKDSK from Command Prompt
- Type CMD on Cortana, then right click on Command Prompt to run it as an administrator
- Type CHKDSK/? to choose from the list of operators the format that you wish to run i.e. CHKDSK /f, CHKDSK /v, etc.
- Type your chosen operator on the prompt and hit enter
3. Run Hard Disk Diagnostics from hardware manufacturer.
Every brand has their own checker and repair kit so that when something goes wrong, you can immediately apply the remedy necessary to keep your computer up and running. Here are some manufacturers’ diagnostic tools:
- Windows Surface Scanner by DTI Data.
- Maxtor’s HDD Bad Sectors Repair.
- Seagate SeaTools by the company having the same name.
- Data Lifeguard Diagnostic by Western Digital.
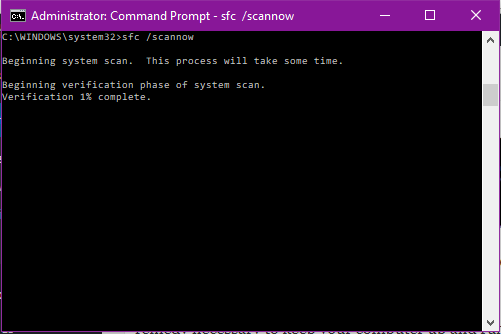
4. Run SFC Scannow
System File Checker is a very helpful tool that fixes a lot of Windows errors. To run it, go to Command Prompt by typing it on Cortana, then right click on System File Checker and click run as administrator. When the command prompt comes up, type “sfc /scannow” and hit enter.
Your hard drive diagnostic may show that your hard drive is ok. This means that the error report you are getting is really nothing more than Windows reporting an error from another process due to file dependencies, human error or a virus attack. In any case, you can run security check then try the following tips.
5. Disable error reporting
The tools that Windows provided you are useful so turning them off is not recommended except for that one special case when you have verified that your hard drive is healthy. When that is the case, you just need to follow these steps to remove the annoying error message:
- Type “gpedit.msc” on Cortana or run it from the Start button, All Applications, Windows System.
- Navigate to Administrative Templates > System > Troubleshooting and Diagnostics > Disk Diagnostics > Configure Execution Level

- On the left side, click Disabled, then click Apply, then OK, and restart your computer
This should take care of the persistent error message. At any rate, make sure you backup files every now and then to avoid hassles of losing your files. Got any other tips you want to share? Comment below, readers will surely appreciate it.
Expert Tip: This repair tool scans the repositories and replaces corrupt or missing files if none of these methods have worked. It works well in most cases where the problem is due to system corruption. This tool will also optimize your system to maximize performance. It can be downloaded by Clicking Here