Updated April 2024: Stop getting error messages and slow down your system with our optimization tool. Get it now at this link
- Download and install the repair tool here.
- Let it scan your computer.
- The tool will then repair your computer.
Configure Microsoft Windows 10 to automatically close applications when they are shut down and never worry about the system not shutting down properly.

By default, when applications have unsaved data, Windows 10 displays a “Close applications and shut them down” screen, prompting the user to “Cancel anyway” or “Cancel”. Individual applications are listed with the words “This application prevents you from shutdown” or “This application prevents you from restarting”. If the user has not made his choice after about two minutes, he will return to his desktop and will not be shut down or rebooted again.
However, users can change this and prevent Windows from closing the application. This helps users maintain the progress of their current work and securely close applications. In this article we will provide methods that you can use to change these settings in various ways.
We have these methods that will prevent Windows 10 applications from shutting down when they close. One method is executed with the Local Group Policy editor and the other with the Registry editor. Both will have the same result; however it depends on what the user has access to and is familiar with.
Check the problem with SFC scanning
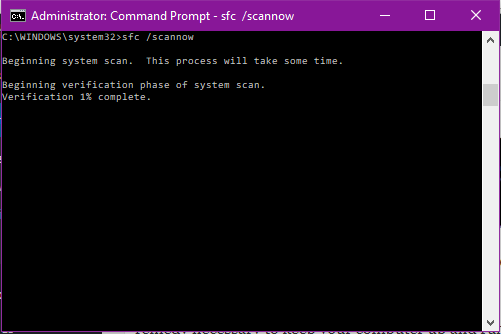
This problem may occur due to system files being corrupted. I recommend that you run a system file check. The System File Check (SFC) is performed to check for damaged system files that may be causing this problem. Please follow the instructions below:
- Press Windows Key + X and select Command Line (Administrator) to display the command line with elevated privileges.
- On the command line, type sfc / scannow and press Enter.
- Reboot the computer.
If no corrupted system files were found in the previous state, we recommend the following steps:
- Open the command line by pressing the Windows + X keys and selecting “Administrator command line”.
- At the command line, type the following commands and press Enter after each command:
- DISM.exe / Online / Clear image / Scanhealth
- DISM.exe / Online / Clear image / Restore functionality
- Close the command line, reboot the computer and see if it works.
April 2024 Update:
You can now prevent PC problems by using this tool, such as protecting you against file loss and malware. Additionally it is a great way to optimize your computer for maximum performance. The program fixes common errors that might occur on Windows systems with ease - no need for hours of troubleshooting when you have the perfect solution at your fingertips:
- Step 1 : Download PC Repair & Optimizer Tool (Windows 10, 8, 7, XP, Vista – Microsoft Gold Certified).
- Step 2 : Click “Start Scan” to find Windows registry issues that could be causing PC problems.
- Step 3 : Click “Repair All” to fix all issues.

Disable the automatic termination of applications that block or cancel the shutdown.

- Type gpedit.msc in the search at startup and press Enter to open the Group Policy editor. The Group Policy Editor is only available in Windows 10 Pro, Windows 10 Enterprise, and Windows 10 Education, but not in Windows 10 Home.
- Go to Computer Configuration> Administrative Templates> System> Shutdown Options.
- Now click on the right pane to Disable automatic shutdown of applications that block or cancel the shutdown.
- Click Change Policy Settings. In the window that opens, you can activate or deactivate this policy.
- If you enable this option, console or GUI applications without visible top level windows blocking or canceling shutdown will not automatically close during shutdown.
- If you disable this option, these applications will automatically close when they shut down so that Windows can shut them down faster and easier.
- You can also use Windows Registry to do this. Run regedit and navigate to the next key:
- HKEY_LOCAL_MACHINE \ Software \ Microsoft Policies \ Windows \ System
- Right click on the right pane, select “Create”>”DWORD” (32-bit value), call it AllowBlockingAppsAtShutdown and enter the value 1.
Disable the automatic termination of the application when it terminates its work through the registry editor

Another way is to change these settings using the registry editor. Most users are much more familiar with the registry editor. However, the registry editor has fewer settings than the first method. Keys or values may not exist and the user will have to create them manually. To try it, follow these steps:
- Press the Windows + R key to open the execution window. Now type “regedit” and press Enter to open the registry editor. Also, press “Yes” to open “Account Control” (UAC) to open it with administrator rights.
- In the registry editor windows, use the left pane to go to the next section:
- HKEY_LOCAL_MACHINE \ SOFTWARE \ Policies \ Microsoft \ Windows \ System
- Now find the value AllowBlockingAppsAtShutdown in the right pane. If not, right-click anywhere in the right pane and select “Create”> “DWORD (32-bit)” to create a new value and name it AllowBlockingAppsAtShutdow.
- Double-click the value and change it to 1. Click the OK button to apply the changes.
- After making any changes, be sure to restart the computer for the changes to take effect.
Expert Tip: This repair tool scans the repositories and replaces corrupt or missing files if none of these methods have worked. It works well in most cases where the problem is due to system corruption. This tool will also optimize your system to maximize performance. It can be downloaded by Clicking Here

CCNA, Web Developer, PC Troubleshooter
I am a computer enthusiast and a practicing IT Professional. I have years of experience behind me in computer programming, hardware troubleshooting and repair. I specialise in Web Development and Database Design. I also have a CCNA certification for Network Design and Troubleshooting.