Updated April 2024: Stop getting error messages and slow down your system with our optimization tool. Get it now at this link
- Download and install the repair tool here.
- Let it scan your computer.
- The tool will then repair your computer.
If your webcam or laptop camera is not detected or does not turn on, try to correct the flow and perform a short test. Try different applications to see if it’s a hardware problem like Youcam, Skype, Line, Facebook Messenger, etc.

The problem can be caused by:
- The camera driver is obsolete or incorrectly installed.
- The camera has been disabled in the Device Manager.
- The camera has been turned off under Privacy or Lenovo Settings.
- The equipment is defective.
Why your webcam doesn’t work
It’s really very simple why your camera doesn’t work. The obvious reason is that your drivers are not compatible with your webcam. If you are sure you have the right drivers, a webcam may be disabled or deactivated. On some laptops, the webcam can be disabled by a combination of keys or by pressing a function key (F1 – F12 keys). The manufacturer’s webcam applications also have the ability to disable the webcam. This is called the privacy mode that prevents any application from accessing your webcam. In rarer situations, your webcam may have a loose connection, probably after a mechanical hit or if you have tried to repair it. On the basis of these elements, here are some solutions to this problem.
Check the image devices
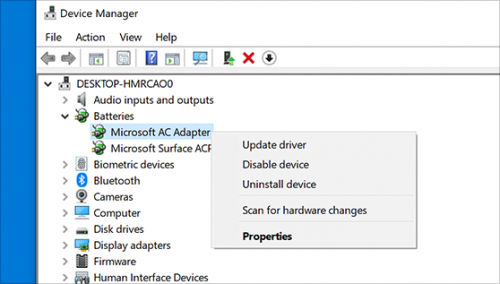
Please check under’Imaging devices’ in the’Device manager’ if the integrated webcam is recognized. How to check the webcam in the’Device Manager’:
Hold down the Windows key and press the “R” key. This will open the Run window -> type’devmgmt.msc’ without brackets, click’Ok’ -> it will open the Device Manager window.
- Under “Imaging Devices”, you will find the list of “Webcams”.
- Right-click and uninstall.
- Restart and see if it makes a difference.
Rollback Webcam Driver

Here is another common scenario. An updated driver may not be compatible with your Windows 10. The only way to solve this problem is to install an older version. Normally, if you have just updated Windows, you would have a go back option, otherwise you would have to download and install an older version.
April 2024 Update:
You can now prevent PC problems by using this tool, such as protecting you against file loss and malware. Additionally it is a great way to optimize your computer for maximum performance. The program fixes common errors that might occur on Windows systems with ease - no need for hours of troubleshooting when you have the perfect solution at your fingertips:
- Step 1 : Download PC Repair & Optimizer Tool (Windows 10, 8, 7, XP, Vista – Microsoft Gold Certified).
- Step 2 : Click “Start Scan” to find Windows registry issues that could be causing PC problems.
- Step 3 : Click “Repair All” to fix all issues.

- Open Webcam Properties in the Device Manager and go to the Drivers tab.
- Click on the cancellation driver, then select Yes.
- Once the flashback is complete, restart your computer, then try to reopen the camera application.
Uninstalling the USB root hub
If the problem persists, you can uninstall the USB root hubs from the Device Manager and see if it makes a difference. To uninstall the USB root hubs:
- Expand’Universal Serial Bus Controller’.
- Look for’USB Root Hub’ in the list.
- Right-click, select’Uninstall’, select’Ok’.
- Uninstall all the’USB Root Hub’ listed.
- Wait until all drivers are uninstalled.
- The computer has been restarted.
- When the computer restarts, the USB root hubs are automatically installed on the computer.
Checking the camera’s privacy settings
Are the privacy settings of your laptop camera enabled?
To do this, proceed as follows:
- Click on Start
- Click on Settings
- Enter the webcam in the search field.
- Click on Webcam Privacy Settings
- Check if the Allow applications to use my camera option is enabled.
Activating the camera in the settings
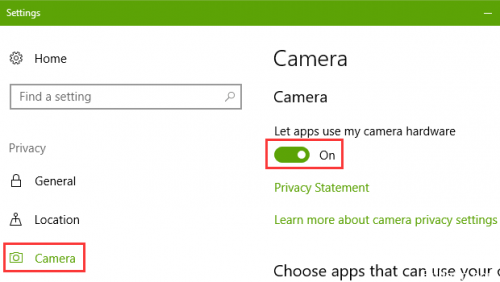
Some users may not know how to start the laptop camera when switching from their predecessors to Windows 10. In fact, it is easy to find the camera in the Start menu. You can also see the error “We need your permission” after opening the camera application. In this case, you must turn on the laptop camera via the settings.
Step 1: Use the Windows Win + I shortcuts to start the settings.
Step 2: Access the Privacy menu.
Step 3: On the left, select Camera.
Step 4: Set the switch on the right side under “Let Apps Use My Camera Hardware” to the ON position.
Scroll down and turn on applications that can access the camera.
https://www.dell.com/community/Laptops-General-Read-Only/Web-Camera-Not-Working/td-p/4168866
Expert Tip: This repair tool scans the repositories and replaces corrupt or missing files if none of these methods have worked. It works well in most cases where the problem is due to system corruption. This tool will also optimize your system to maximize performance. It can be downloaded by Clicking Here

CCNA, Web Developer, PC Troubleshooter
I am a computer enthusiast and a practicing IT Professional. I have years of experience behind me in computer programming, hardware troubleshooting and repair. I specialise in Web Development and Database Design. I also have a CCNA certification for Network Design and Troubleshooting.