Updated April 2024: Stop getting error messages and slow down your system with our optimization tool. Get it now at this link
- Download and install the repair tool here.
- Let it scan your computer.
- The tool will then repair your computer.
If you have just purchased a new USB 3.0 drive (or hard drive) and have noticed surprisingly slow read/write speeds, keep reading for the quick fix! A USB 3.0 drive should achieve write speeds of at least 15-20 MB per second, if not more. But Windows is not properly configured by default to achieve these speeds.
![]()
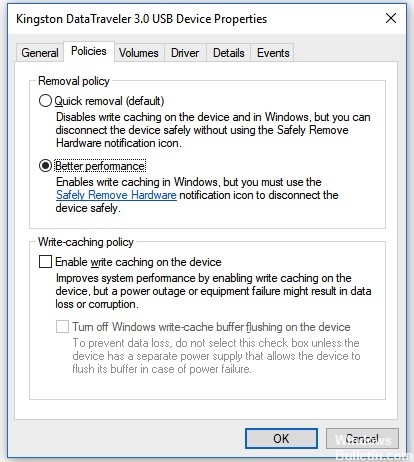
There are essentially two options for this setting, one that enables caching and requires (or strongly recommends) that you select the “Safely Remove Hardware” option in the taskbar before removing the drive, and the other that you can simply remove at will. The latter is the default setting and will result in a significant reduction in transfer speeds.
Before implementing this option, remember that you want to use the eject option when you remove your USB device. Simply right-click on the USB device icon in the menu bar and select “Eject Mass Storage Device”. This will prevent potential cache data loss problems. Ok, now that we’ve discussed this, let’s move on to the solution!
Use the Device Manager to Optimize USB 3.0
1. Right-click on the Windows icon and select “Device Manager”.
2. 2. Expand the drive drivers in the Device Manager and locate your USB device, right-click on your USB device or hard drive and select “Properties”.
Go to the “Policies” tab and select “Best Performance”, click “OK” to make sure you want to optimize and improve your USB transfer speed.
You will probably be prompted to reboot your computer, and you should see much faster transfer speeds after that!
Troubleshooting Hardware and Devices
Try to troubleshoot hardware and peripherals. The steps are listed below:
April 2024 Update:
You can now prevent PC problems by using this tool, such as protecting you against file loss and malware. Additionally it is a great way to optimize your computer for maximum performance. The program fixes common errors that might occur on Windows systems with ease - no need for hours of troubleshooting when you have the perfect solution at your fingertips:
- Step 1 : Download PC Repair & Optimizer Tool (Windows 10, 8, 7, XP, Vista – Microsoft Gold Certified).
- Step 2 : Click “Start Scan” to find Windows registry issues that could be causing PC problems.
- Step 3 : Click “Repair All” to fix all issues.

- Type “Troubleshooting” in the search bar and press Enter.
- Click “View All” on the left side of the troubleshooting window.
- Click on “Hardware and Devices” and follow the instructions on the screen.

Updating USB Controller Drivers
If the USB 3 transfer speed slows down after upgrading to Windows 10, it may be due to driver incompatibility. In this case, you should update the USB controller driver. Use one of the following two techniques:
Use Windows Update to update the driver:
Step 1: Make sure Windows Update is enabled. Press Windows + “I” to open the settings. Click on “Update & Security” and select “Windows Update”.
Step 2: Check for pending Windows updates.
Step 3: Start the update. Before you start, save your open work.
Step 4: Restart your computer if this does not happen automatically and confirm if the transfer speed of UB 3.0 has increased slowly.
Update the driver via the Device Manager :
Step 1: Press Windows + “X” and click on “Device Manager”.
Step 2: Expand the universal serial bus controllers in the list to see more items.
Step 3: Right-click a driver, click “Update Drive” and follow the instructions. Do the same for all other drivers.
Step 4: Reboot your PC and confirm that the transfer speed has improved.
Change the “Policies” option to “Best Performance”.
The USB 3.0 policy option in the Device Manager defaults to Quick Remove, allowing users to remove their USB 3.0 connected devices without using the Safe Remove option. To change this option to improve USB 3.0 performance, follow these steps:
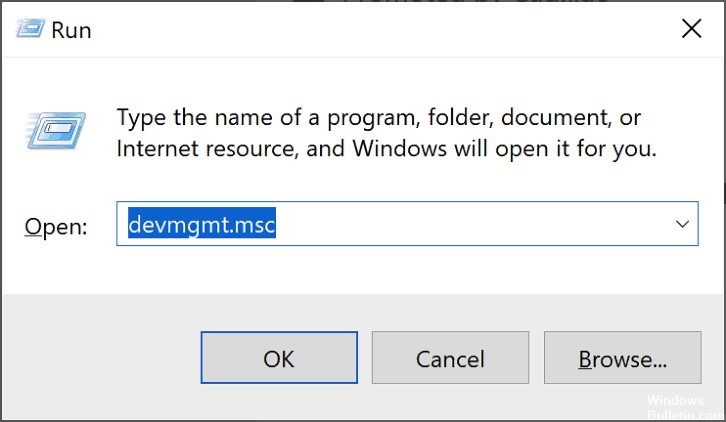
- Hold down the Windows key and press the R key to open Run. Type “devmgmt.msc” in the dialog box and press Enter to open Device Management.
- Locate the drive you are using via USB 3.0. Right-click and select the Properties option.
- Go to the Policies tab and change the option to Best Performance. Also select the Enable write cache on device option check box (see below).
- Once these settings have been applied to your drive, check the transfer speed improvement.
Expert Tip: This repair tool scans the repositories and replaces corrupt or missing files if none of these methods have worked. It works well in most cases where the problem is due to system corruption. This tool will also optimize your system to maximize performance. It can be downloaded by Clicking Here

CCNA, Web Developer, PC Troubleshooter
I am a computer enthusiast and a practicing IT Professional. I have years of experience behind me in computer programming, hardware troubleshooting and repair. I specialise in Web Development and Database Design. I also have a CCNA certification for Network Design and Troubleshooting.