Updated April 2024: Stop getting error messages and slow down your system with our optimization tool. Get it now at this link

If you are using Windows 11 and recently updated your system with the cumulative update KB5006746, you may have printing problems. If you try to print documents after the update, you may get an error message that says Windows failed to connect to the printer. This is a common error reported by many users, and this problem mostly occurs after the KB5006746 update.
It’s interesting to note that the cumulative update KB5006746 was released to address printing issues in Windows 11. While the update helped most users, some had additional printer issues.
What is causing the “Windows failed to connect to printer” error?

- Faulty updates.
- Discontinued printer maintenance.
- Network connection problem.
- The network printer is turned off.
- The driver is out of date or damaged.
- Windows resolution problem, etc.
How do I repair the “Windows could not connect to the printer” issue?
You can now prevent PC problems by using this tool, such as protecting you against file loss and malware. Additionally it is a great way to optimize your computer for maximum performance.
The program fixes common errors that might occur on Windows systems with ease - no need for hours of troubleshooting when you have the perfect solution at your fingertips:
April 2024 Update:

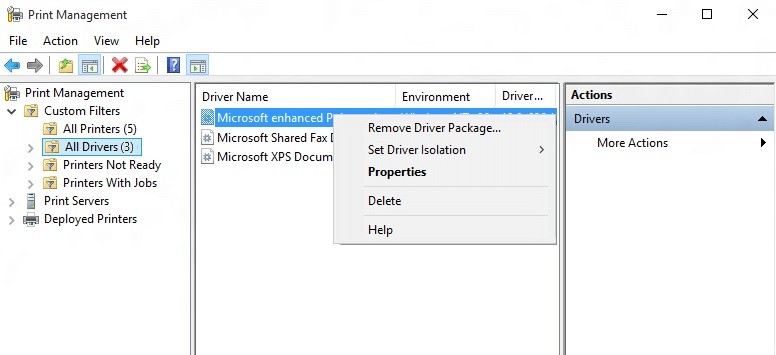
Uninstall the incompatible printer drivers
- Press Windows + R, and type print management.MSC and press Enter.
- Click All Drivers in the left pane of the window.
- Then right-click the printer driver in the right pane and choose Uninstall.
- If you see more than one printer driver, repeat the steps above.
- Try adding the printer and install its drivers again.
Create a new local port
- Press the Windows + X key and select Control Panel.
- Then click Hardware and Sound, and then click Devices and Printers.
- On the top menu, click Add Printer.
- If your printer is not listed, click on the link “The printer you want is not listed”.
- On the next screen, select “Add a local or network printer with manual settings” and click Next.
- Select Create New Port, then choose the Local Port option from the Port Type drop-down list, then click Next.
- Enter the printer address in the Printer Port Name field in the following format:
- IP address or computer name – printer name.
- Then click OK and click Next.
- Follow the instructions on the screen to complete the process.
Restart the Druckerspooler service
- Press Windows + R, type services.MSC and press Enter.
- Find the Druckerspooler service in the list and double-click it.
- Make sure that the startup type is set to Automatic and that the service is running.
- Then click Stop, and then Start again to restart the service.
- Click Apply and then OK.
- Then try adding the printer again.
Expert Tip: This repair tool scans the repositories and replaces corrupt or missing files if none of these methods have worked. It works well in most cases where the problem is due to system corruption. This tool will also optimize your system to maximize performance. It can be downloaded by Clicking Here
Frequently Asked Questions
How do I troubleshoot Windows that can’t connect to a printer?
- Press Win+R (the key with the Windows logo and the R key) at the same time. A Run dialog box will open.
- Type printmanagement.msc in the run field and click OK.
- In the left pane, click All Drivers.
- In the right pane, right-click the printer driver and choose Delete from the context menu.
- Add the printer again.
Why does my computer tell me that it cannot connect to a printer?
There are a number of reasons why PC users can't connect to a shared printer - one of the main reasons is that file and printer sharing is disabled. In addition, file and printer sharing is not allowed by the Windows firewall on your computer and on the computer to which the printer is connected.
How do I uninstall incompatible printer drivers?
- Press Windows + R, type printmanagement.msc, and then press Enter.
- Click All Drivers in the left pane of the window.
- Then right-click on the printer driver in the right pane and choose Uninstall.
- If you see more than one printer driver, repeat the steps above.
- Try adding the printer and install its drivers again.
