Updated May 2024: Stop getting error messages and slow down your system with our optimization tool. Get it now at this link
- Download and install the repair tool here.
- Let it scan your computer.
- The tool will then repair your computer.
Hyper-V is not a tool for inexperienced PC users. It is a utility that replaces Microsoft Virtual PC and allows multiple operating systems to run on a single device. Hyper-V makes life easier for software developers, IT professionals or technical professionals who choose to work or experiment with multiple operating systems, including different versions of Linux, FreeBSD, and Windows. The use of the tool does not require the injection of physical material into the machines. Hyper-V transforms different operating systems into virtual machines (“guests”) running in parallel on a single computer (“hosts”).
Virtualization technology allows us to run a virtual machine in the operating system of your current machine. Before you can use Hyper-V to create a virtual machine, you must enable Hyper-V. This article shows you how to enable or disable Hyper-V on Windows 10.
Disabling Hyper-V in Windows features
1. open the Windows functions.
2. Expand the Hyper-V subsection and follow steps 3 or 4 for what you want to do.
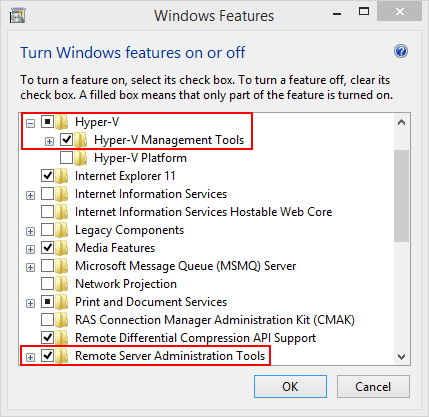
3. To activate Hyper-V
A) Make sure that all Hyper-V options are enabled as described above, click OK and proceed to step 5.
May 2024 Update:
You can now prevent PC problems by using this tool, such as protecting you against file loss and malware. Additionally it is a great way to optimize your computer for maximum performance. The program fixes common errors that might occur on Windows systems with ease - no need for hours of troubleshooting when you have the perfect solution at your fingertips:
- Step 1 : Download PC Repair & Optimizer Tool (Windows 10, 8, 7, XP, Vista – Microsoft Gold Certified).
- Step 2 : Click “Start Scan” to find Windows registry issues that could be causing PC problems.
- Step 3 : Click “Repair All” to fix all issues.

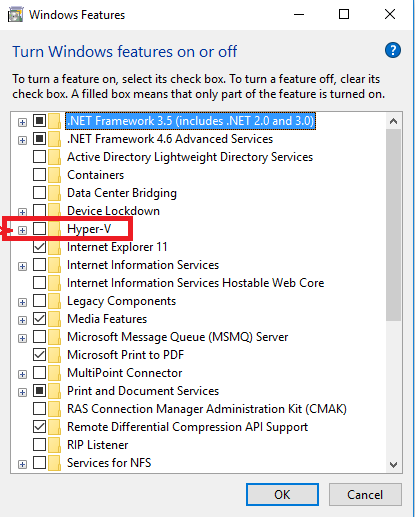
4. To disable Hyper-V
A) Disable Hyper-V, click OK and proceed to step 5 below.
Restart the computer when prompted.
Disable Hyper-V through the BIOS
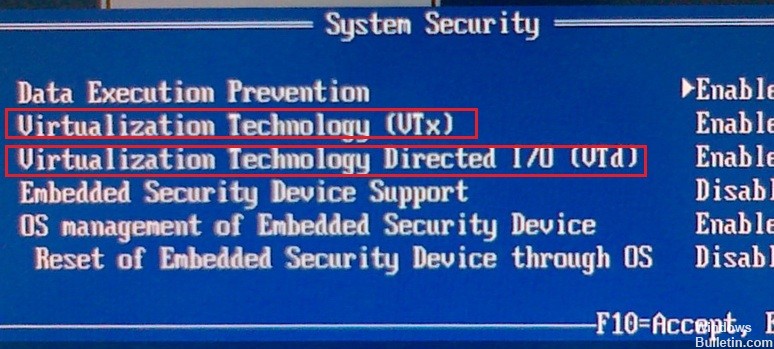
Another tip is that you can keep the Shift key pressed when you click Start -> Power key -> Restart to be able to choose whether you want to start with/without Hyper-V before the computer restarts. This is especially useful when a form of “Fastboot” is enabled in the BIOS, and it is almost impossible to press the “Enter BIOS” button before the Windows boot loader takes control.
Disable Hyper-V with the command
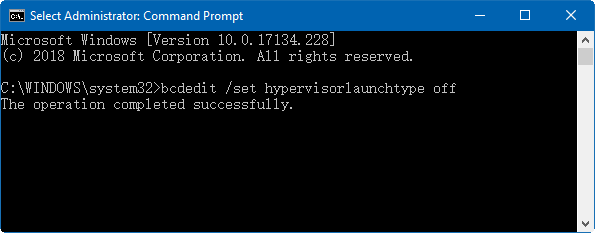
To do: Press Windows Logo + X, then press A to execute the command prompt as administrator. In the Command Prompt window, type bcdedit /set hypervisorlaunchtype off and press Enter to execute this command.
Disable Hyper-V by stopping the service.

Look for “Service” in the Start menu, press Enter to open the Component Service window. Then click on the Services option in the left pane and press the H key on your keyboard. This can help you locate and quickly find the Hyper-V virtual machine management service. When you receive it, right-click it and select Stop.
Disable Hyper-V Windows 10 PowerShell
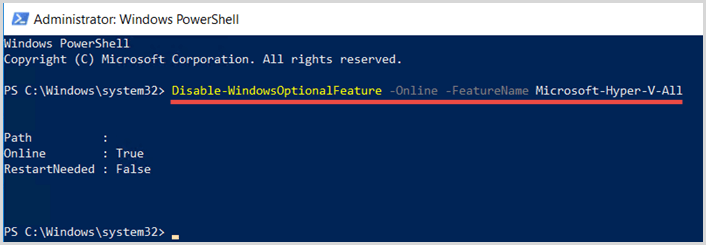
Step 1: Right-click on the start icon and select Windows PowerShell (admin).
Step 2: Copy and run the command line below.
Disable WindowsOptionnel -Online functionality -FunctionalityNameMicrosoft-Hyper-V-All
disable hyper-v powerhell
Step 3: Restart Windows 10 to make the changes effective.
CONCLUSION
In some cases, it has been discovered that some applications require Hyper-V to be disabled to work. In this article, we will show you the easiest ways to disable Hyper-V on Windows 10. Be sure to follow the steps carefully to avoid further complications.
https://superuser.com/questions/540055/convenient-way-to-enable-disable-hyper-v-in-windows-8
Expert Tip: This repair tool scans the repositories and replaces corrupt or missing files if none of these methods have worked. It works well in most cases where the problem is due to system corruption. This tool will also optimize your system to maximize performance. It can be downloaded by Clicking Here

CCNA, Web Developer, PC Troubleshooter
I am a computer enthusiast and a practicing IT Professional. I have years of experience behind me in computer programming, hardware troubleshooting and repair. I specialise in Web Development and Database Design. I also have a CCNA certification for Network Design and Troubleshooting.