Updated April 2024: Stop getting error messages and slow down your system with our optimization tool. Get it now at this link
No matter how powerful your processors are, there is always something consuming all your resources. Perhaps the most unpleasant problem to solve is high CPU utilization due to system interrupts. Note: this is almost always caused by hardware or device drivers.
The steps you can take to solve this problem are described below. We will cover this in more detail later.
What causes system interruptions High CPU utilization?
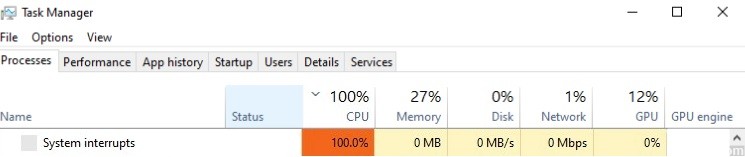
System interrupts are an official part of the Windows operating system that controls the interaction between your computer’s hardware and systems. It appears as a process in Task Manager and shows CPU usage for all hardware interrupts.
System interrupts are like an alarm system for the CPU. When a script requires the CPU’s attention, the system interrupts remind the CPU of its high-priority state. The CPU then interrupts its work, writes it down, and processes the important task. Once the job is complete, it returns to its original state.
If there are many interrupts, this means that errors can occur in the hardware and therefore take up a lot of resources.
In general, system interrupts consume from 0.1 to 2% of the CPU power. Sometimes this figure can be as high as 7%, which is also considered normal. However, it can happen that system interrupts consume 100% of the CPU power. This is quite dangerous. If the system interrupts consume more than 10% of the CPU, you should pay attention, as this indicates a hardware failure.
How to eliminate high CPU load due to system interrupts?
You can now prevent PC problems by using this tool, such as protecting you against file loss and malware. Additionally it is a great way to optimize your computer for maximum performance.
The program fixes common errors that might occur on Windows systems with ease - no need for hours of troubleshooting when you have the perfect solution at your fingertips:
April 2024 Update:


Eliminate faulty hardware
If a corrupted driver can cause a system interruption, it can also refer to faulty hardware. In this case, updating the drivers will not solve the problem.
A faulty power supply or laptop charger can also be the cause of system downtime. Try replacing them or unplugging them as well.
Unplug or disconnect all external devices
USB hardware is a common culprit. You can either unplug external USB devices or disable USB root hubs in Device Manager, i.e., prevent external hardware from interrupting your CPU.
In Device Manager, find the Universal Serial Bus Controllers entry and disable any USB root hubs you find.
Disconnect internal devices
- Go to the Start menu, find and open Device Manager (also available in Control Panel), expand Devices, right-click on a device, and select Disconnect.
- Do this for one device at a time, check CPU usage by system interrupts, or run the DPC Latency Checker again, then right-click on the device and select Enable before moving on to the next device.
- Also, do not try to disable display adapters, the hard drive the system is running on, IDE controllers, the keyboard or mouse (unless you have another input device such as a touchpad), or the monitor.
Disabling sound effects
- Right-click on the speaker icon in the system tray and select Playback Devices.
- Double-click the default device (speaker) to open the properties, click on the “Extensions” tab, and disable all sound effects.
- Confirm with the OK button and check how the system interrupts behave now.
Expert Tip: This repair tool scans the repositories and replaces corrupt or missing files if none of these methods have worked. It works well in most cases where the problem is due to system corruption. This tool will also optimize your system to maximize performance. It can be downloaded by Clicking Here
Frequently Asked Questions
How to fix system interrupts High CPU usage in Windows 10?
- Disable USB root hubs.
- Check or update hardware drivers.
- Disable internal devices.
- Disable sound effects (turn off sound enhancement).
- Update your computer's bios.
Why is my CPU usage suddenly so high?
If the process is still consuming too much CPU, try updating your drivers. Drivers are programs that control certain peripherals connected to your motherboard. Updating drivers can fix compatibility issues or bugs that cause increased CPU usage. Some rare bugs can also be fixed by updating the BIOS version.
How do I disable system interruptions in Windows 10?
- Right-click on the Windows Start menu and select Device Manager from the menu.
- Expand the Network Adapters dialog box.
- Then right-click on the network adapter and select Properties.
- Click the Advanced tab.
- Set to Off in the drop-down menu, one at a time.
- Click OK to save your settings.
