Updated April 2024: Stop getting error messages and slow down your system with our optimization tool. Get it now at this link
A layer in Photoshop is, as the name implies, a file that can be overlaid. A new image has only one layer. However, if you add multiple layers on top of the original image, you can add more data or use them just for color or tonal correction. Thus, using layers, you can change the image to your liking without changing the original pixels.
Smart Objects, on the other hand, are a special type of layer that contains image data. They are designed to preserve all the original characteristics of the layer, and also give you the ability to do extensive non-destructive editing on the layer.
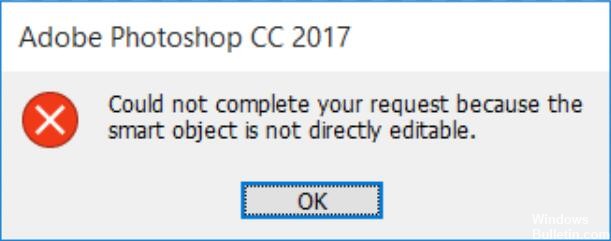
What causes the message “Your request cannot be fulfilled because the smart object is not directly editable”?
The affected image layer is blocked: The most common cause of this problem is that the selected image layer is blocked or partially blocked. Follow method 1 to unlock the selected image layer.
The affected layer contains vector data: This problem can also occur when you try to delete a selection that contains vector data. In this case, rasterizing the layer should solve the problem.
If you are having trouble solving this problem, this article provides several repair strategies. Below are some solutions that many users who have encountered the same problem have used to get around the error message.
How to fix the “Your request cannot be processed because the smart object is not directly editable” error message?
You can now prevent PC problems by using this tool, such as protecting you against file loss and malware. Additionally it is a great way to optimize your computer for maximum performance.
The program fixes common errors that might occur on Windows systems with ease - no need for hours of troubleshooting when you have the perfect solution at your fingertips:
April 2024 Update:

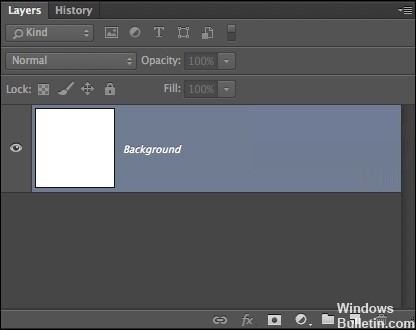
Unblock the image layer
- Open Photoshop on your computer.
- Load the image that displays the error message.
- Before selecting, use the menu on the right to go to the Layers tab and click the “Lock” icon to unlock the partially locked layer.
- When the layer is unlocked, select the area you want to cut, copy and delete.
- Check to see if the error continues to occur.
Rasterizing a layer
- First, open the Photoshop application on your device.
- Right-click on the layer where the error message appeared and select Rasterize Layer.
- After rasterizing the smart object, you can try repeating the same process that caused the problem to see if the error has been fixed.
Converting a smart object to a regular layer
- Double-click the Smart Objects icon in the Layers panel.
- Go to Layer -> Smart Objects -> Edit Content.
- Go to Properties and choose Edit Content.
Expert Tip: This repair tool scans the repositories and replaces corrupt or missing files if none of these methods have worked. It works well in most cases where the problem is due to system corruption. This tool will also optimize your system to maximize performance. It can be downloaded by Clicking Here
Frequently Asked Questions
How do I make a smart object not directly editable?
Unlock the layer with the image. If you get the error message "Your request cannot be completed because the smart object is not directly editable," the easiest solution is to open the wrong image and unlock the image layer in Photoshop. You can then delete, cut or modify the selected image.
How do you make a smart object editable?
- In your document, select the Smart Object layer in the Layers panel.
- Choose Layer -> Smart Objects -> Edit Content.
- Click OK to close the dialog box.
- Edit your file until it is completely impossible.
- Choose File -> Save to apply the changes.
- Close the original file.
How do I replace a smart object in Photoshop?
- Select the smart object layer in the Layers panel.
- Choose Layer -> Smart Objects -> Replace Contents.
- In the Place dialog box, locate the new file and click Place.
- Click OK when the dialog box appears, and the new content will be placed in the desired location, replacing the old one.
How do I unlock a layer in Photoshop?
- Click the Lock All Pixels icon in the Layers panel to lock all layer properties.
- Click the icon again to unlock them.
- In the Layers panel, click the Lock Transparency icon to lockout transparent areas of the layer and not draw on them.
- Click the icon again to unlock it.
