Updated April 2024: Stop getting error messages and slow down your system with our optimization tool. Get it now at this link
- Download and install the repair tool here.
- Let it scan your computer.
- The tool will then repair your computer.
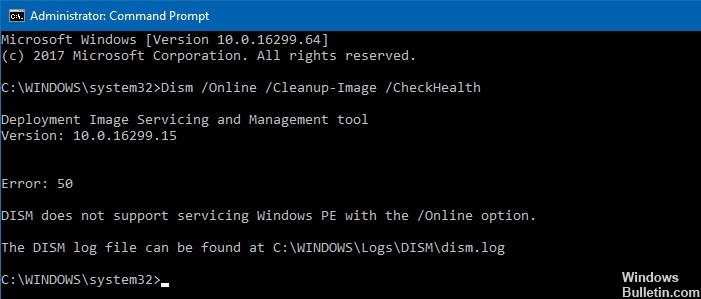
When executing DISM commands, you might receive an error message like “Error 50 DISM doesn’t support OS servicing with the /online switch”. This error prevents Windows from loading properly. There are several ways to solve this problem. You can check whether all the necessary files exist on your hard disk before starting the process. There are several ways you can fix the DISM error. The most common way to fix the issue is to run DISM without the /online parameter, which works fine for many people, but it won’t work for everyone. If you’re still having trouble, here are some other solutions you can try.
The BIOS needs to be reset
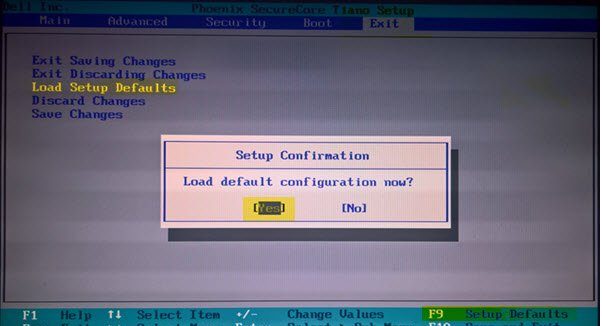
The solution to this problem is quite simple. All you need to do is reset the BIOS settings to the default settings. This will help you resolve most of the common issues that you might encounter while working on your laptop. In case you still face issues after resetting the BIOS, then you can always contact the support center and ask for further assistance.
To reset the BIOS settings on your laptop, follow these steps:
1. Power off the laptop.
2. Press F12 during startup.
3. A screen will pop up with options like CMOS Setup, Security Settings, etc.
4. Choose the Advanced Tab and press Enter.
5. Select Reset System Configuration and press Enter.
6. Follow the instructions displayed on the screen.
7. After completing the procedure, restart your laptop by pressing the power button.
8. Now, you should be able to use DISM again.
April 2024 Update:
You can now prevent PC problems by using this tool, such as protecting you against file loss and malware. Additionally it is a great way to optimize your computer for maximum performance. The program fixes common errors that might occur on Windows systems with ease - no need for hours of troubleshooting when you have the perfect solution at your fingertips:
- Step 1 : Download PC Repair & Optimizer Tool (Windows 10, 8, 7, XP, Vista – Microsoft Gold Certified).
- Step 2 : Click “Start Scan” to find Windows registry issues that could be causing PC problems.
- Step 3 : Click “Repair All” to fix all issues.

DISM software should be refreshed
If you receive the following error when trying to run dism.exe /online /Cleanup-Image /RestoreHealth, it could mean that the DISM database is corrupted. To fix this issue, follow these steps:
1. Open Command Prompt as Administrator: Right-click on the Start button and select Command Prompt (Admin).
2. Type sfc/scannow and hit Enter.
3. Wait for the command prompt to close.
4. Reboot your computer normally.
5. Run Dism again and try to repair the DISM database.
6. Restart your PC once more and let us know if the problem persists.
7. If the problem still occurs, please contact Microsoft support.
Utilize the command prompt
If you’re having trouble booting into Windows 10, there are several things you can do to fix the problem. One of the most common problems people run into while trying to boot into Windows 10 involves the “DISM Does Not Support Servicing Windows PE With the /Online Option.” This error occurs when attempting to use the /online switch on the command prompt. Here are some quick fixes for this error.
1. Open the Start menu and type cmd in the Search bar. Press Enter.
2. In the Command Prompt window, type in the following commands:
– Type in the next Commands in the Command Prompt window.
3. You’ll see a list of options. Select the one that says “Repair Disk Permissions”.
4. Click OK.
5. Wait for the process to complete. When finished, reboot your computer.
A new user account must be created
If you receive a “Windows cannot start because DISM does not support servicing Windows PE” error message while installing Windows 10, there are several workarounds that can help resolve it. One of those workarounds is creating a different user account on your PC and logging into the newly created account to complete the installation process. This solution works fine for many people, here’s how to fix the problem:
1. Open the Start menu and type “PC Settings.” Click the Manage button under Personalization.
2. Under the Manage Accounts section, select Add a new user.
3. Choose Other Users and enter the name of the person you want to add to your PC.
4. Make sure the checkbox beside Allow this user to sign in to my PC is selected.
5. Use the arrow keys to highlight the Sign-in automatic option. If it’s already checked, uncheck it.
6. Click OK to continue.
7. Log out from the current account and log back in with the new user.
8. Install Windows 10 using the new user account.
9. Once the installation completes, go back to the original user account and delete the new user account.
Make sure the Related Windows PE Registry Key is deleted
If you are one of those whose computer runs slowly because of the missing registry key, you might want to know how to fix it. There are many reasons why the registry key could disappear, such as installing programs incorrectly, improperly uninstalling software, or even deleting important files. Whatever the reason, here is what you need to do to restore the missing registry key:
1. Open regedit.exe.
2. Navigate to HKEY_LOCAL_MACHINE\SOFTWARE\Microsoft\Windows NT\CurrentVersion\Winlogon.
3. Locate the value named Shell.
4. Right-click on the value and select Modify.
5. Add a string value called StartupFolder.
6. Double-click on the StartupFolder value to open its properties.
7. Set the Value data to %SystemRoot%\system32.
8. Close the Properties dialog box.
9. Restart your computer.
Expert Tip: This repair tool scans the repositories and replaces corrupt or missing files if none of these methods have worked. It works well in most cases where the problem is due to system corruption. This tool will also optimize your system to maximize performance. It can be downloaded by Clicking Here
Frequently Asked Questions
How do I fix DISM not supporting Windows PE maintenance with the online option?
Open the registry editor by typing Regedit at the command prompt and pressing Enter. Navigate to one of the key paths mentioned above. Right-click on WinPE and remove it. Now run the DISM tool with the online option and check that it works.
How to repair the DISM error?
- Correct Install .wim file location.
- Copy your Install file.
- Clean the components of the system image.
- Run Windows Update troubleshooting.
- Reset the Windows Update services.
- Disable the proxy server.
How do I get DISM into Windows PE?
Open Start. Find the Command Prompt, right-click on the top result and select Run as administrator. Type the following command to restore the image with the file "install.esd", then press Enter: DISM /Online /Cleanup-Image /RestoreHealth /Source:C:\ESD\Windows\install.
