Updated April 2024: Stop getting error messages and slow down your system with our optimization tool. Get it now at this link
- Download and install the repair tool here.
- Let it scan your computer.
- The tool will then repair your computer.
Some Windows 10 users had difficulty solving a strange problem that prevented all Microsoft Office icons from appearing when they were looking for a particular application in the Start menu. Most of the users concerned report that the icon is displayed correctly when they manually navigate to the application from the Start menu, but without using the search function. The problem seems to be limited to Windows 10 only.
![]()
While some users report that the problem only occurs with Office programs, others have said that the problem also occurs with other third-party programs.
Reconstruction of the icon cache in Windows 10
The Icon Cache or IconCache.db is a special database file that Windows uses to keep copies of individual icons handy. When Windows needs to draw a symbol, it uses the copy of the cache instead of retrieving the symbol image from the original file. This helps Windows to draw symbols faster. Things were different under Windows XP, and they are different under Windows 7/8. From Windows 8.1 onwards, the situation has changed again. On Windows 10, you must do the following.
If you were to recreate the icon cache on Windows 7 / 8, you would have to do the following: Open File Explorer > Folder Options > Views to view hidden system files. Then go to C:\Users\%username%\AppData\Local folder and delete the hidden IconCache.db file. Restart. This action would clean and reconstruct the icon cache.
Recreate your thumbnail cache at the command prompt.
To get rid of the cache memory of unnecessary thumbnails and for your system to display the thumbnails again, you must execute the following commands with your command prompt. Here’s how you can do it:
April 2024 Update:
You can now prevent PC problems by using this tool, such as protecting you against file loss and malware. Additionally it is a great way to optimize your computer for maximum performance. The program fixes common errors that might occur on Windows systems with ease - no need for hours of troubleshooting when you have the perfect solution at your fingertips:
- Step 1 : Download PC Repair & Optimizer Tool (Windows 10, 8, 7, XP, Vista – Microsoft Gold Certified).
- Step 2 : Click “Start Scan” to find Windows registry issues that could be causing PC problems.
- Step 3 : Click “Repair All” to fix all issues.

- Click on the Windows logo icon in your taskbar. The Start menu opens.
- Now locate the search area. Type’cmd’ (without quotation marks) in the search and press Enter.
- Locate the command prompt in the list of available options.
- Right-click and select Run as administrator. This opens a raised Command Prompt window.
- First, you must stop the File Explorer. To do this, type the following command in the Command Prompt window and press Enter: taskkill /f /im explorer.exe
- Let’s delete the thumbnails from your database using the following command: del /f /s /q /a %LocalAppData%\Microsoft\Windows\Explorer\thumbcache_*.db Then press Enter.
- It’s time to start the File Explorer: launch explorer.exe
Finally, exit the Command Prompt window and restart your PC. Check that your thumbnails are present and displayed correctly.
Using the System File Checker
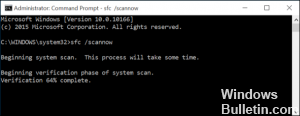
As this is one of the easiest ways to repair your search in the Start menu, we recommend that you try it first. Open a high command prompt (right-click on Command prompt, then click on Run as administrator), then type the following command:
sfc /scannow
This checks your system files for errors and damage and automatically attempts to correct them. If the search in the Start menu is a system process, all errors in this process must be detected using the SFC utility.
Always display icons, never thumbnails.
![]()
In the event that the thumbnails still do not appear on Windows 10, it is possible that someone or something may change the folder settings.
- Open the File Explorer.
- Click on the View tab.
- Click Options to open Folder Options.
- Click on the View tab.
- Be sure to uncheck the Always display icons, never thumbnails box.
- Click on Apply.
- Click OK to complete the task.
Expert Tip: This repair tool scans the repositories and replaces corrupt or missing files if none of these methods have worked. It works well in most cases where the problem is due to system corruption. This tool will also optimize your system to maximize performance. It can be downloaded by Clicking Here

CCNA, Web Developer, PC Troubleshooter
I am a computer enthusiast and a practicing IT Professional. I have years of experience behind me in computer programming, hardware troubleshooting and repair. I specialise in Web Development and Database Design. I also have a CCNA certification for Network Design and Troubleshooting.