Updated April 2024: Stop getting error messages and slow down your system with our optimization tool. Get it now at this link
- Download and install the repair tool here.
- Let it scan your computer.
- The tool will then repair your computer.
Since Microsoft’s latest Windows 10 updates, many users have reported problems with their graphics cards no longer working properly or failing completely. This problem is by no means unique to NVIDIA GPUs. Since then, MS Windows manufacturers have released new updates that attempt to resolve the issues. However, the results depend on the device and configuration of your PC. If you are experiencing similar problems with your GPU, this guide will teach you how to reset your NVIDIA drivers in Windows 10. Problems include blue screens while playing games, lower frames per second (FPS) and occasional errors when trying to run certain games.

Usually, driver updates can improve your PC’s performance and add new features to your gaming experience.However, when there are so many companies responsible for different parts of your computer architecture, you may encounter problems.Compatibility issues between different updates released by different vendors. Rolling back your drivers to an earlier version can solve these compatibility problems.
Restore using the Device Manager
- Press the Windows + R key to open Run.
- Type devmgmt.msc and click OK to open the Device Manager.
- In Device Manager, expand the Graphics Cards category.
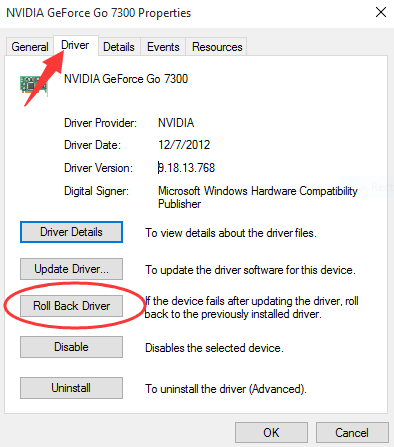
- Right-click the NVIDIA graphics device and select Properties.
- In the “Properties” window, open the “Driver” tab.
- Pay attention to the driver version and date.
- Click the Roll back the driver button.
- In the Rollback Driver Package window, select the reason and click Yes.
- Windows will restore the driver to a previous version.
- Then open the Driver tab again and check the date and version of the driver to make sure that the restore process was successful.
April 2024 Update:
You can now prevent PC problems by using this tool, such as protecting you against file loss and malware. Additionally it is a great way to optimize your computer for maximum performance. The program fixes common errors that might occur on Windows systems with ease - no need for hours of troubleshooting when you have the perfect solution at your fingertips:
- Step 1 : Download PC Repair & Optimizer Tool (Windows 10, 8, 7, XP, Vista – Microsoft Gold Certified).
- Step 2 : Click “Start Scan” to find Windows registry issues that could be causing PC problems.
- Step 3 : Click “Repair All” to fix all issues.

What should I do if the driver rollback button is inactive?
If the driver roll back button in Device Manager is inactive, then Windows can’t find an NVIDIA driver to roll back. In this case, you will need to manually download and install an older version of the NVIDIA driver. Learn how to do this.
- Download the latest working version of the NVIDIA driver for your GPU. You can find the NVIDIA driver on the official website.
- Press the Windows + R key.
- Type devmgmt.msc and click OK.
- In Device Manager, expand Graphics cards.
- Right-click your NVIDIA graphics device and select Update Driver.
- Select the My Computer Browser option for the driver software.
- Click the Browse button, select the downloaded NVIDIA driver and click Open.
- Click Next and wait for Windows to install the driver.
- Once installed, go to the Driver tab and check to see if the driver’s version and date have changed to confirm installation.
Return to a previous version of Windows 10

Some Nvidia driver users have problems after updating their versions of Windows. If this update is an issue and both of the above methods don’t work for you, you can try restoring your version of Windows 10.
Note. Some of the latest Windows 10 users don’t have the option to restore Nvidia drivers on their laptop or PC. Those who don’t have recovery options in Windows 10 can remove the updates using the settings below.
1) Enter Windows settings by pressing “Windows + i” or by clicking the Windows icon in the lower left corner and then clicking the “Settings” icon. Now you need to select “Update and Security” in the settings window.
2) You should now click on “Update History” in the “Windows Update Center” window.
3) Now select “Remove Updates” in the Update History window.
4) Now you can select any update you want to remove from the list of updates by selecting it and clicking on the uninstall option.
Note. If you have the option to go back to a previous version of Windows 10, as shown below, click the “Start” button.
After selecting the “First Steps” option, all you have to do is click “Next” two or three times. You may need to select the reason for restoring a previous version of Windows.
Expert Tip: This repair tool scans the repositories and replaces corrupt or missing files if none of these methods have worked. It works well in most cases where the problem is due to system corruption. This tool will also optimize your system to maximize performance. It can be downloaded by Clicking Here

CCNA, Web Developer, PC Troubleshooter
I am a computer enthusiast and a practicing IT Professional. I have years of experience behind me in computer programming, hardware troubleshooting and repair. I specialise in Web Development and Database Design. I also have a CCNA certification for Network Design and Troubleshooting.