How to Troubleshoot VIDEO_TDR_FAILURE (ATIKMPAG.SYS) on Windows PC

The Blue Screen of Death (also known as Blue Screen of Death or BSOD) caused more problems than we could ever count. One such blue screen error is VIDEO_TDR_FAILURE (ATIKMPAG.SYS).

This error occurs when you try to play a video file, play a game, or do anything else related to your computer’s video output.

Instead of working normally, your computer displays a blue screen with an error message like “VIDEO_TDR_FAILURE (atikmpag.sys)“. It then reboots, but the problem does not resolve itself. Depending on the brand of your video card, the error may have a different name. read more

Troubleshooting “Windows 10 Freezes Randomly” Issue

If you type “computer randomly freezes” on the Internet, you’ll find similar complaints everywhere. This problem can lead to other horrible problems like a black or blue screen of death, accidental computer freeze, system crash, or even boot disk failure if users don’t find a way to fix it in time. Therefore, we have collected here the most effective methods that will be helpful to other users.

What causes Windows 10 to freeze randomly?

  • Overheating
  • Missing DLL
  • Software error
  • Broken drivers
  • Virus infections
  • Memory conflict
  • Too many running programs

How to fix random freezing in Windows 10?

Perform a memory check

  1. On your keyboard, hold down the Windows logo key and press R at the same time to invoke the run command.
  2. Type mdsched.exe in the Run window and press Enter.
  3. If you want to check for problems immediately, click Restart Now and check for problems (recommended).
  4. If you want to check later, click Check for problems the next time you start your computer.
  5. Windows will then reboot and you will see this page showing the progress of the check and the number of passes in memory.

Start the disk check

  1. Close all open programs and files.
  2. Click Start -> File Explorer -> This Computer.
  3. Find the disk you want to check, right-click it, and select Properties.
  4. Click the Tools tab and then click Check.
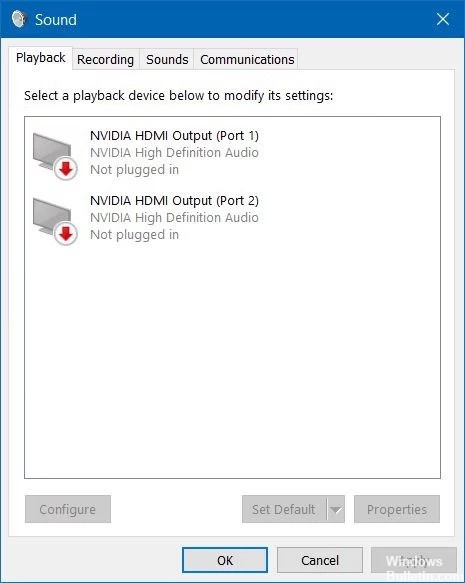
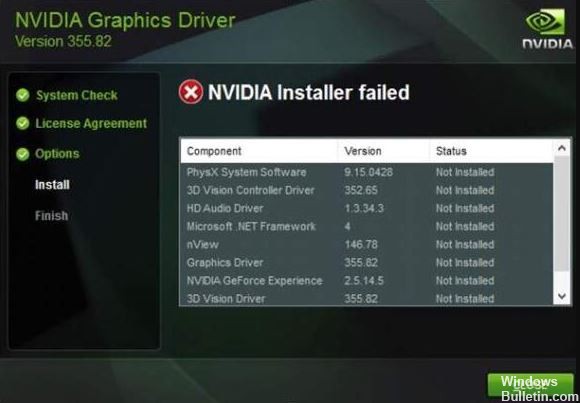
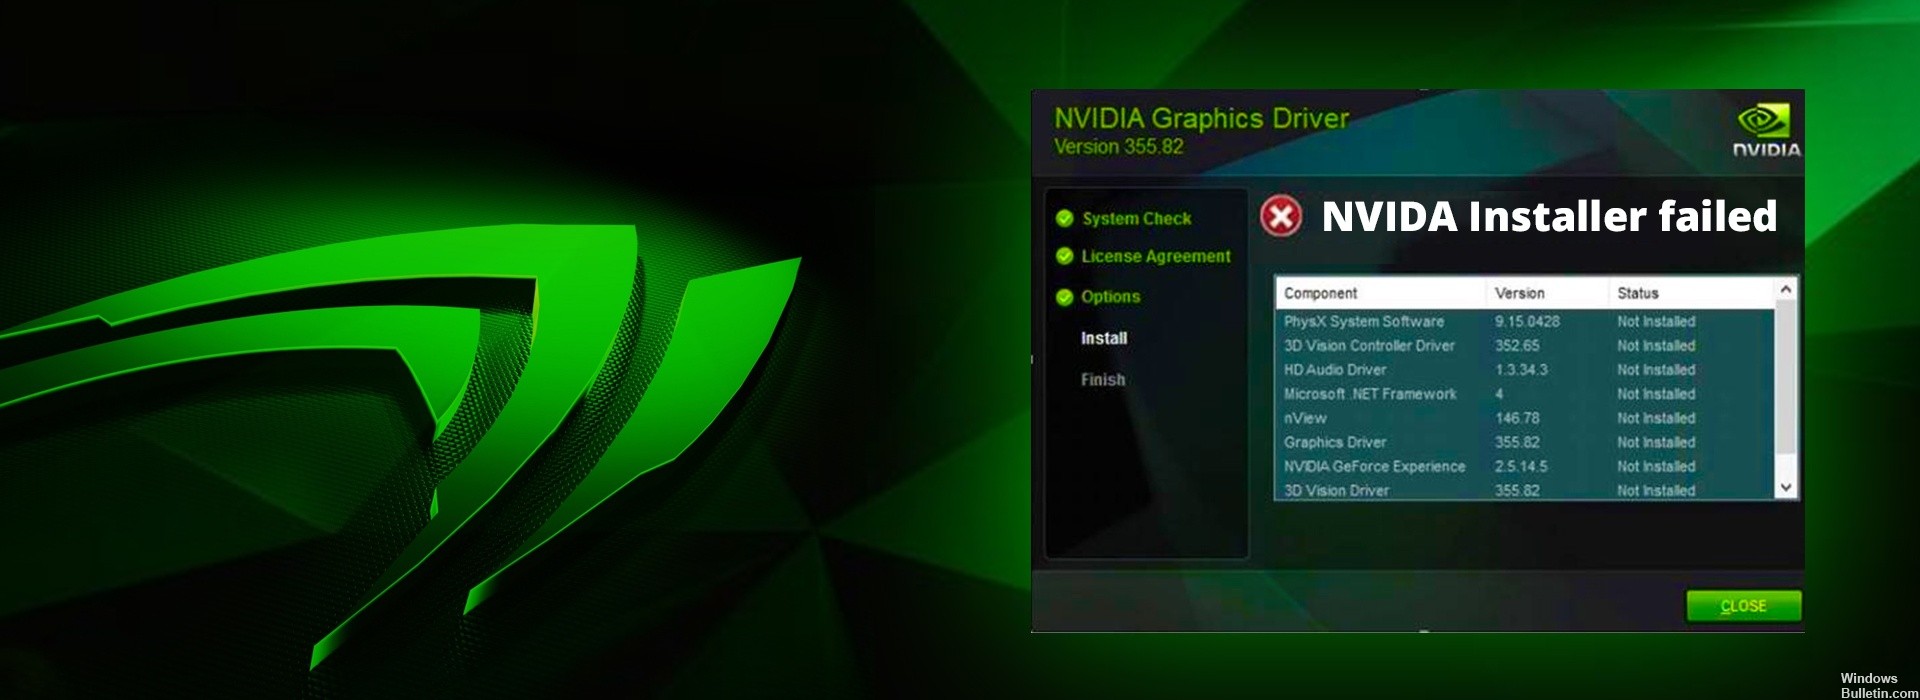
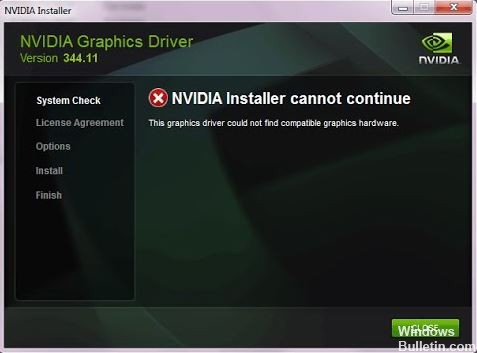
Update your drivers

Windows 10 freeze problem may be caused by outdated drivers. So, to solve the problem, you can try to update your drivers. If you don’t have the time, patience, or computer skills to update your drivers manually, you can do it automatically with a third-party driver update program. read more

How to Resolve “NVIDIA Output Not Plugged In” Error in Windows PC

Some NVIDIA users complain about the problem when they see the “Not Connected” message on the soundbar for NVIDIA highlighted outputs. If you also encounter a similar problem on your computer, just follow these simple solutions to resolve the issue. This problem can either be caused by a corrupted graphics driver or disconnected sound ports.

What causes the NVIDIA output not to connect?

This problem can be caused either by outdated drivers that don’t work well with your device, or by newer drivers, as some users have reported. read more

How to Resolve ‘Nvidia Control Panel Won’t Open’ in Windows PC

The NVIDIA Control Panel provides easy access to NVIDIA graphics card settings. Many users have complained that the NVIDIA Control Panel does not open in Windows, preventing them from accessing important graphics card settings.

If you’ve encountered a problem like this, you’ve come to the right place. Here we have described some solutions to the “NVIDIA Control Panel doesn’t open” problem.

Why won’t the Nvidia Control Panel open?

For Nvidia Control Panel to work, your computer must be running certain services. Usually, your computer starts these services automatically when you turn it on. However, it is possible that for some reason these services stop working, preventing you from opening the Nvidia Control Panel. read more

How to Resolve: “NVIDIA Installer Failed” Error Message on Windows PC

The “NVIDIA Installer Failed” issue is the most common among Windows 10 users because Windows 10 seems to have a rather complicated relationship with NVIDIA GPU drivers. Fortunately, there are many ways to solve the “NVIDIA Installer Failed” issue and install the drivers successfully. Here are the most effective ways to resolve the “NVIDIA Installer Failed” issue and successfully install drivers for NVIDIA GPU.

What causes the “NVIDIA Installer Failed” problem message?

After updating your system to Windows 10, Windows Update will try to load and install the GPU drivers in the background. Sometimes this can take up to 5-10 minutes. If you try to install the NVIDIA driver at the same time, you will most likely get this error. read more

How to Repair “NVIDIA Installer Cannot Continue” Error Message in Windows PC

Do you get the “NVIDIA Installer Cannot Continue” error when installing NVIDIA drivers? Don’t worry, you’re in the right place. Here are some simple solutions to the problem when the NVIDIA installer fails to continue on Windows 10.

When trying to install the latest NVIDIA graphics card, many users report that the NVIDIA driver installation cannot continue. This is a really discouraging error message, but you don’t have to worry about it because by the end of this article, you will be able to troubleshoot the NVIDIA Installer and not be able to continue with Windows 7. read more

How to Repair Geforce Experience Error Code 0x0003 in Windows 10

If you try to open GeForce Experience in Windows, but it fails and you see an error message :

Something has gone wrong. Try rebooting your computer, then restart GeForce Experience. ERROR CODE: 0x0003

We have seen many Windows users report this error as well. Moreover, you can probably fix it yourself. Here are some very effective solutions you can try. You don’t have to try them all; just browse through the list until you find a solution that works for you.

What is causing the Geforce Experience error code 0x0003?

  • Problem with the network adapter
  • A corrupted Windows update
  • Defective Nvidia driver
  • Nvidia services are not working

How can I fix the Geforce Experience error code 0x0003?

Reinstall Nvidia components

  1. You can press Windows + R to open “Run” and type CPL to open the “Programs and Features” window.
  2. Find all the Nvidia programs in this window, right-click on any of them and select Uninstall.
  3. Restart your computer and download the GeForce Experience again. This will also automatically download and install the latest version of the missing drivers.
  4. Once the download process is complete, you can restart your computer and see if the GeForce Experience error code 0x0003 has disappeared.

Forced Restart of Nvidia Services

  1. Press Windows + R, type MSC and press Enter to open the Windows Services application.
  2. Find all the Nvidia services in the Services window, right-click on one of them and select Restart to restart the Nvidia service.
  3. If some Nvidia services are not running, you can right-click them and select Start to start them.

Update the Nvidia graphics drivers to the latest version

  1. You can open the Windows 10 Device Manager. Just press Windows + X and select Device Manager to open it.
  2. Expand Display Adapters and right-click on your Nvidia graphics card, then select Update Driver to update it to the latest version.

Allow the Nvidia telemetry service to communicate with the desktop

  1. Press Windows + R, type MSC, and press Enter to open the Windows Services application.
  2. Then find the Nvidia Telemetry container and, by right-clicking on it, select Properties.
  3. Click the Connection tab and make sure that the Allow service to interact with the desktop checkbox is selected.
  4. Click the Apply button.

=&0=&

How to Resolve VIDEO_SCHEDULER_INTERNAL_ERROR on Windows 10

The VIDEO_SCHEDULER_INTERNAL_ERROR error occurs if you have recently installed new hardware or software that causes a conflict between the video drivers and Windows 10. An internal video scheduler error is a blue screen of death (BSOD) that indicates that the video scheduler has detected a serious problem. The error is usually caused by the video card and its drivers and has an error code 0x00000119.

When the VIDEO_SCHEDULER_INTERNAL_ERROR error appears, the PC usually reboots, and the PC probably shuts down for several minutes before this error occurs. The screen seems to constantly freeze, which seems to frustrate many users. But before we move on to solve this problem, we first need to understand what is causing this VIDEO_SCHEDULER_INTERNAL_ERROR and then we can fix this error. read more

Troubleshooting DirectDraw Error on Windows 10 Legacy Games

If you got an error with DirectDraw as the keyword in its description, you probably tried to run a certain app or game. Other users have also complained that their games don’t open because of DirectDraw errors. So the problem you encountered is not really an exception.

DirectDraw is a DirectX component used by most games and advanced graphics programs in Windows. To be honest, DirectX errors vary greatly. So it makes sense that the messages or descriptions informing you of problems might be different. Messages that affect DirectDraw are usually as follows: read more

Troubleshooting: Cannot Change Screen Resolution on Windows 10 PC

In general, you can easily change the screen resolution of your Windows 10 computer if you want to. If you find that you can’t change the resolution in Windows 10, you can check out the solutions below to solve this problem. We offer various computer solutions and tools to help you manage your computer better.

What is the reason for not being able to change the screen resolution?

The main reason for this problem is incorrect driver configuration. Sometimes drivers are incompatible and a lower resolution is chosen as a safety measure.

How to resolve the inability to change the screen resolution?

Update your monitor driver

  1. Press Windows + R, type “devmgmt.msc” (without the quotes) and press Enter to open the Device Manager.
  2. Then expand the Display Adapters entry, right-click on the Nvidia video card and select Activate.
  3. Then right-click on the video card again and select Update Driver Software.
  4. Select “Automatically check for updated drivers” and let the process complete.
  5. If the above step solved your problem, that’s fine, if not, keep going.
  6. Select “Update Driver Software” again, but this time select “Search for Driver Software on Computer” on the next screen.
  7. Now select “Select from the list of drivers on my computer”.
  8. Finally, select the driver that is compatible with your Nvidia video card from the list and click Next.
  9. Allow the process to complete and restart your computer to save your changes.

Installing drivers in compatibility mode

  1. Right-click the video card driver configuration file and select Properties.
  2. Click the Compatibility tab and make sure that “Run this program in compatibility mode for” is checked.
  3. Then select Windows 7 or Windows 8 from the drop-down list.
  4. Then click Apply and OK.
  5. Right-click on the installation file again, select Run as administrator and continue with the installation.
  6. Once the installation is complete, restart your computer.
  7. Now press the Windows + I keys to open Settings, and click on System.
  8. Click on Advanced Display Settings under Display Settings.
  9. Select the new value under Resolution.
  10. Then click Apply and close everything.
  11. Restart your computer.

Make sure that Windows has been updated

  1. Press the Windows + I keys, then select Update and Security.
  2. Then click Check for updates and make sure all pending updates are installed.
  3. After installing the updates, restart your computer to resolve the “Can’t change screen resolution” issue.

Installing the Microsoft Basic Display driver

  1. Press the Windows + R keys, type “devmgmt.msc” and press Enter to open the Device Manager.
  2. Expand the display adapter, right-click on the video card driver, and select “Update Driver Software”.
  3. Then select “Automatically check for updated drivers.
  4. If no update is found, right-click the video card driver again and select “Update Driver Software”.
  5. This time, however, select “Search for driver software on your computer.
  6. On the next screen, select “Select from the list of device drivers on my computer”.
  7. Then select Microsoft Basic Display Adapter and click Next.
  8. Allow the above process to complete, then restart your computer.

=&0=&